Welcome to the tutorial on creating galleries with WP Easy Gallery!
The phrase ‘A picture is worth a thousand words…’ has become increasingly relevant in our modern digital world.
Displaying image galleries on your WordPress pages is a great way to pull visitors into your website message and increase pageview time averages.
WordPress comes with a fairly simplistic photo gallery feature that can be used right out of the box. However, there is no easy way to edit this gallery once you created it in your post or page.
That’s where a gallery plugin like WP Easy Gallery comes to the rescue. Let’s jump into the tutorial to see how create a gallery.
WordPress Gallery Plugins
WP Easy Gallery expands the default WordPress gallery feature to give you the ability to edit your galleries. It gives you the option to change some of the display settings for your galleries. All in one place!
So let’s run through a quick tutorial on how to quickly create a WordPress image gallery.
How to Easily Create Image Galleries in WordPress
Installing WP Easy Gallery
First, you will need to install WP Easy Gallery and activate it. There are two main ways you can do this.
You can either download the plugin here or go to the WordPress plugin repository page and download it from there.
After you’ve downloaded WP Easy Gallery you will be able to upload the plugin from within the WordPress admin Plugins screen.
- Go to Plugins menu item
- Select ‘Add New’
- Click the ‘Upload Plugin’ button and follow the instructions
- Install and activate
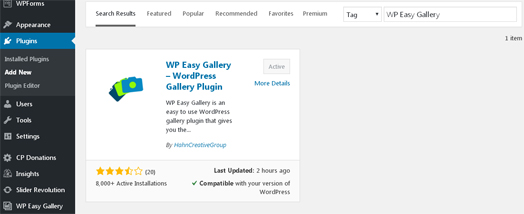
Or, you can do this from directly in the WP Admin console in the Plugins screen following these easy steps:
- Go to ‘Plugins’ menu item on the main admin side navigation.
- Select ‘Add New’ on the top of the screen.
- Find the text box at the top of the screen that says, ‘Search plugins…’ and change the drop down from Keyword to Tag and enter ‘WP Easy Gallery’.
- Click ‘install’ to install the plugin.
- Then click ‘a
ctivate’. - You’re done!

Now you can either get started right away or go to the settings page and change some of the default gallery options. Since we can always change the settings later without having to recreate our galleries, let’s jump straight into creating a gallery and adding some images.
Creating Galleries
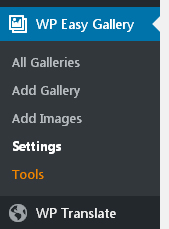
Now that you’ve installed and activated the plugin you should see a new admin menu option on the left titled ‘WP Easy Gallery’. Clicking on this new menu will expand it further to reveal several options.

Before we can start adding images to be displayed in our galleries we need to create a gallery to ‘contain’ our images. Think of a gallery like a bucket or an album the holds a collection of images. This bucket needs to be in place before we load images into it.
Select the ‘Add Gallery’ menu item to navigate to the add gallery page. Here you will enter in a name for your gallery and description.
Setting gallery properties
The ‘Name’ property will be displayed in the list of galleries in the admin section (like post titles) and can also be displayed above the rendered gallery for your viewers.
‘Description’ is a property only used in the admin section. Use this field to enter a description of the gallery.

The other three fields related to thumbnails are optional and only work if you are not using the default WordPress gallery display mode.
If you will be using the WP Easy Gallery display mode, which is like an album style gallery, you can select a unique image as the thumbnail. Don’t worry though, if you leave it blank the gallery will just use the first image in your gallery as the thumbnail.
The thumbnail width and height fields can be used to customize your thumbnail dimensions. Leaving these fields blank will allow the thumbnail image to render full size, or adjusted by any CSS styles you may have on your theme.
Now that you entered in all of this info you are ready to click save. You have created your first gallery and are ready to start adding images.
Adding Images to Your Gallery
Our gallery plugin is integrated with the WordPress Media Library and makes adding images to your gallery extremely simple.
To get started with adding images to your new gallery, navigate to the images page by clicking on the ‘Images’ menu item under the admin menu.
Once you are on the images page you will see a list of all of the galleries you have created so far. Click the ‘Select Gallery’ button for the gallery you want to add images to.

On the images page, you will use the ‘Insert from Media Library’ button to add images to your gallery from the WordPress Media Library. Using the media library wizard you can either select from the images already in the media library or upload new images.
After you have selected or uploaded your images, click the ‘insert’ button on the bottom right. You now have a completed gallery.
From this page, you can also edit add or edit image titles, descriptions, and sort order (the order they appear in the gallery). Make sure you click the ‘Save Changes’ button at the bottom after making any changes.
Displaying Your Gallery
Now that you have created a gallery it’s time to display it to your readers.
WP Easy Gallery uses shortcodes to render the gallery in your post or page. The shortcode for your new gallery can be found by going to the ‘All Galleries’ page in the gallery admin menu.
Copy and paste the appropriate shortcode into your content, or into the Gutenberg shortcode block. You now have a gallery on your page! Check the sample gallery here.
With the amount of online information increasing and attention spans getting shorter, a well-placed image that compliments your content and breaks up a visually boring copy will work wonders for your website engagement.
Using a gallery plugin like WP Easy Gallery makes it simple to add and manage image galleries in WordPress and bring life to your content.
